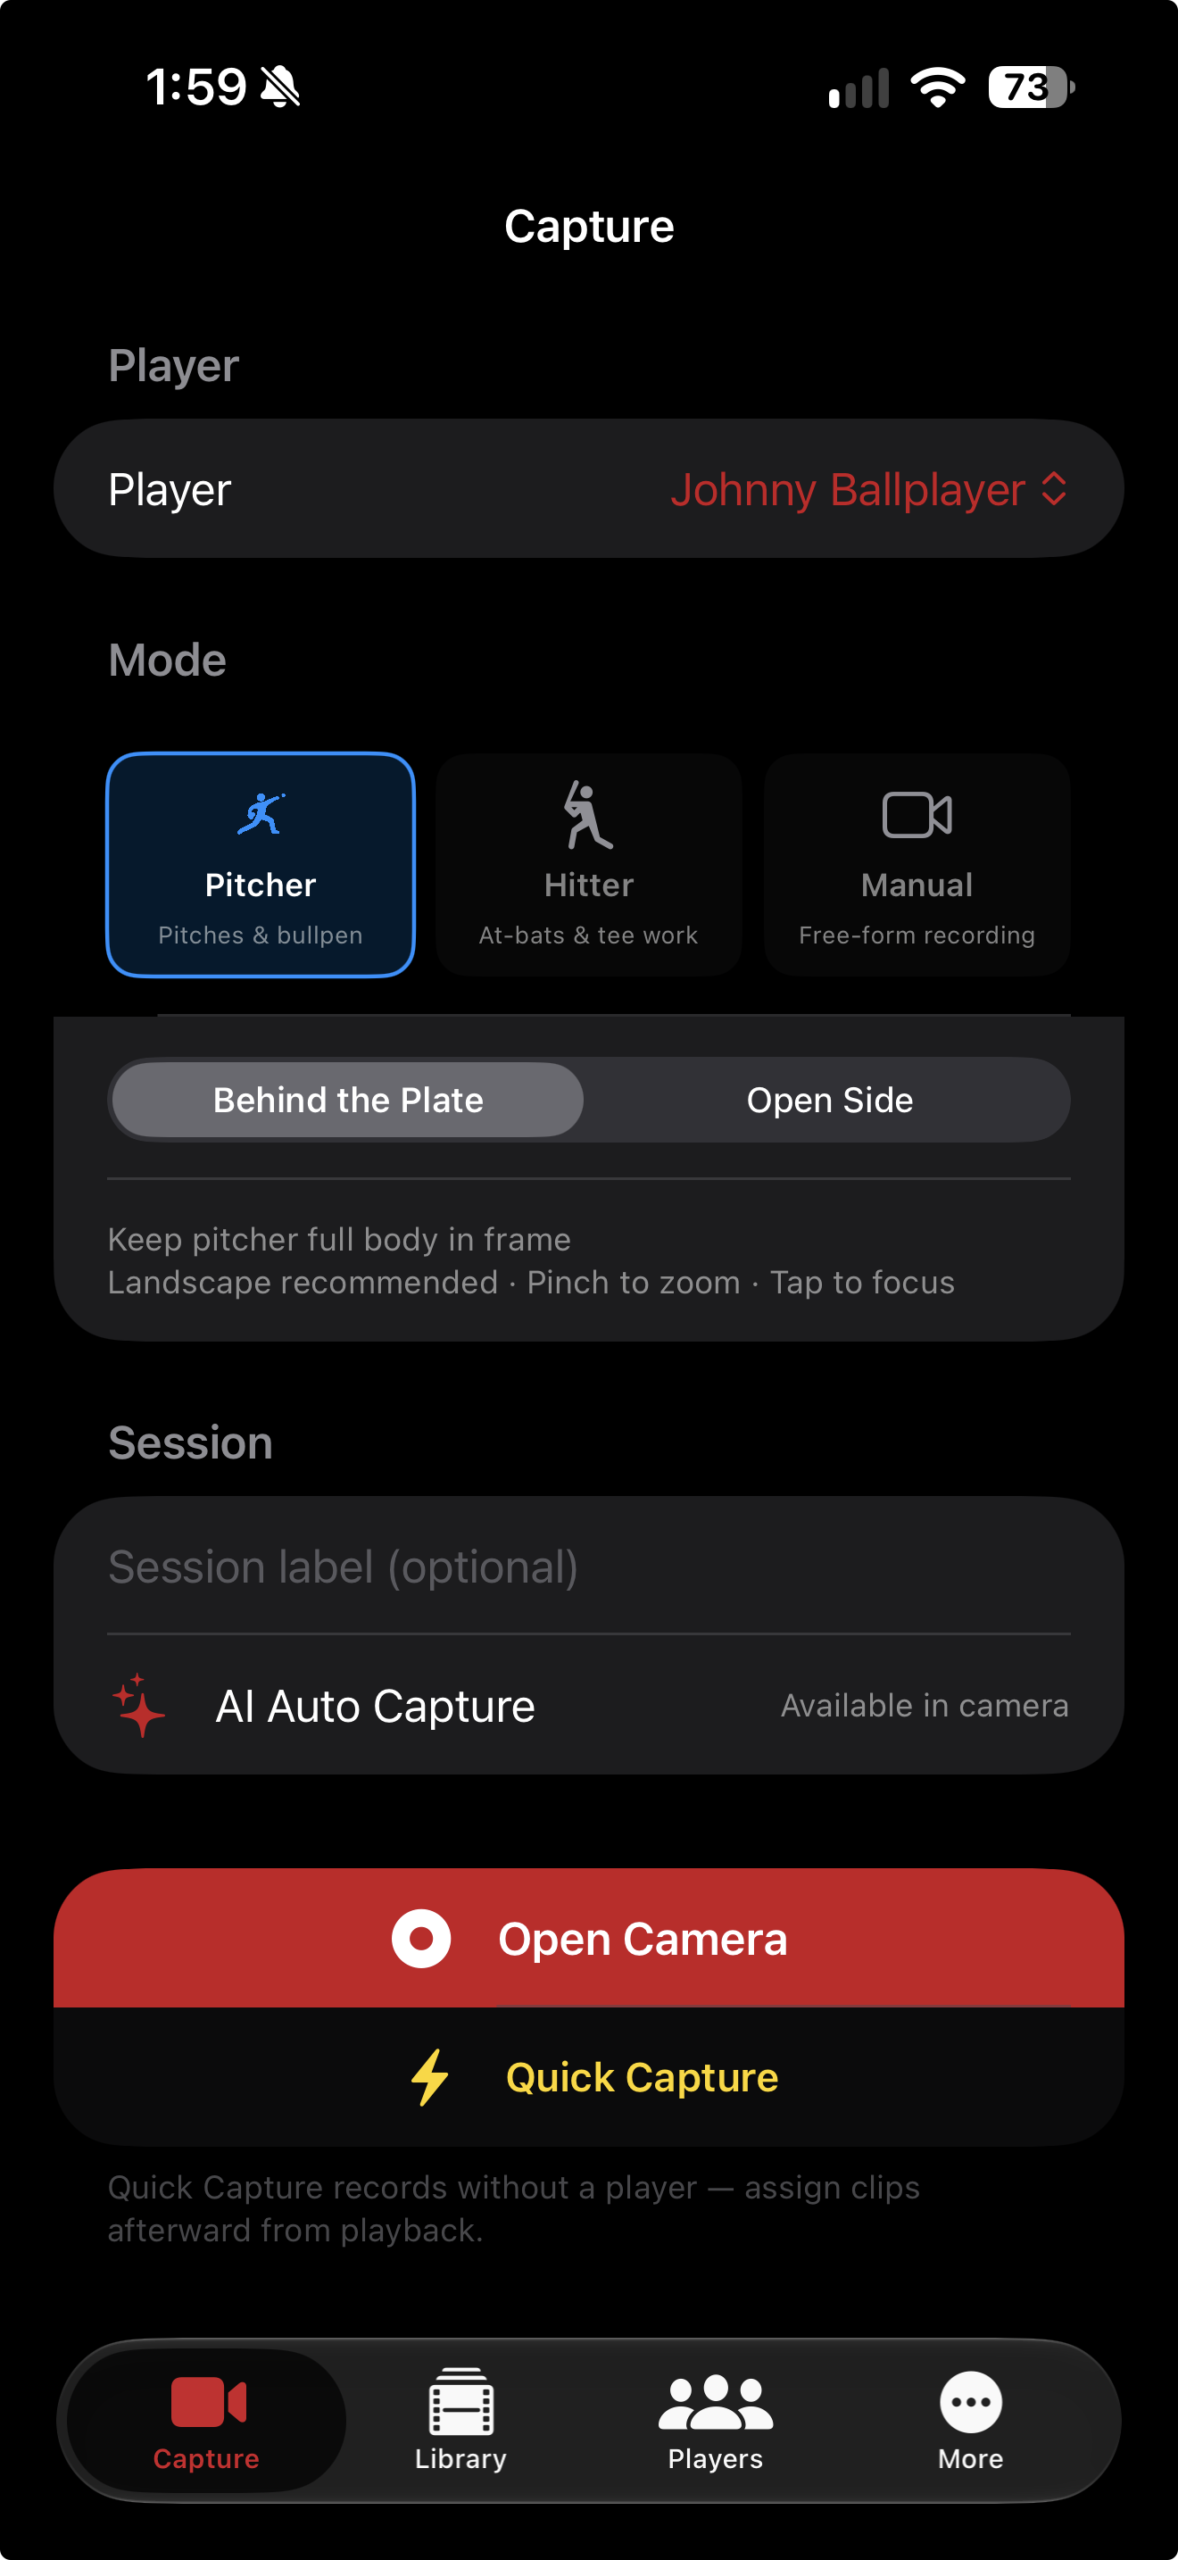
Choose who you’re recording
Every clip is organized under a player, making it easy to find footage later.
First launch: Continue with Apple or create an email account with a password of at least 8 characters. Allow Camera and Microphone access when prompted. Location is optional.
-
Select a player
Open Players to add a name, jersey number, positions, and an optional photo. Then open Capture and select the player.
-
Pick a capture mode
Use Pitcher, Hitter, or Manual for free-form video.
Pitcher mode: choose your angle
Select Behind the Plate or Open Side in the Camera Angle picker. Open Side captures a direct side view of the pitcher; saved clips show “Side view” in their details.
-
Label the session
Add an optional name such as “Tuesday Bullpen” or “Game vs. Eagles.”
-
Open the camera
Tap Open Camera. Add and select a player first to unlock recording.
Player limits: Free and Pro include up to 3 players. Recruit Pro includes unlimited players. Existing players and clips stay accessible if you reach the cap or change plans.
Frame the athlete and start recording
Hold the phone horizontally and keep the athlete’s full body in frame. For a pitcher’s Open Side view, stand square to the mound and film directly from the side. For hitters, include the plate and contact zone. Tap Record to start and again to stop.
Where to stand for an open-side view
For pitchers, choose Pitcher → Camera Angle → Open Side before opening the camera. Keep the view directly side-on, with space for the stride and follow-through.
| Athlete | Film from |
|---|---|
| Right-handed pitcher | 3rd-base side |
| Left-handed pitcher | 1st-base side |
| Right-handed hitter | 1st-base side |
| Left-handed hitter | 3rd-base side |
The pitcher angle picker applies to Pitcher mode. Auto Capture also works from the side: draw the detection zone around the player’s setup position.
Use the guides
Turn on the grid and level, pinch to zoom, and tap the athlete to focus.
Choose video settings
Switch between HD and 4K, standard video, and supported slow-motion frame rates.
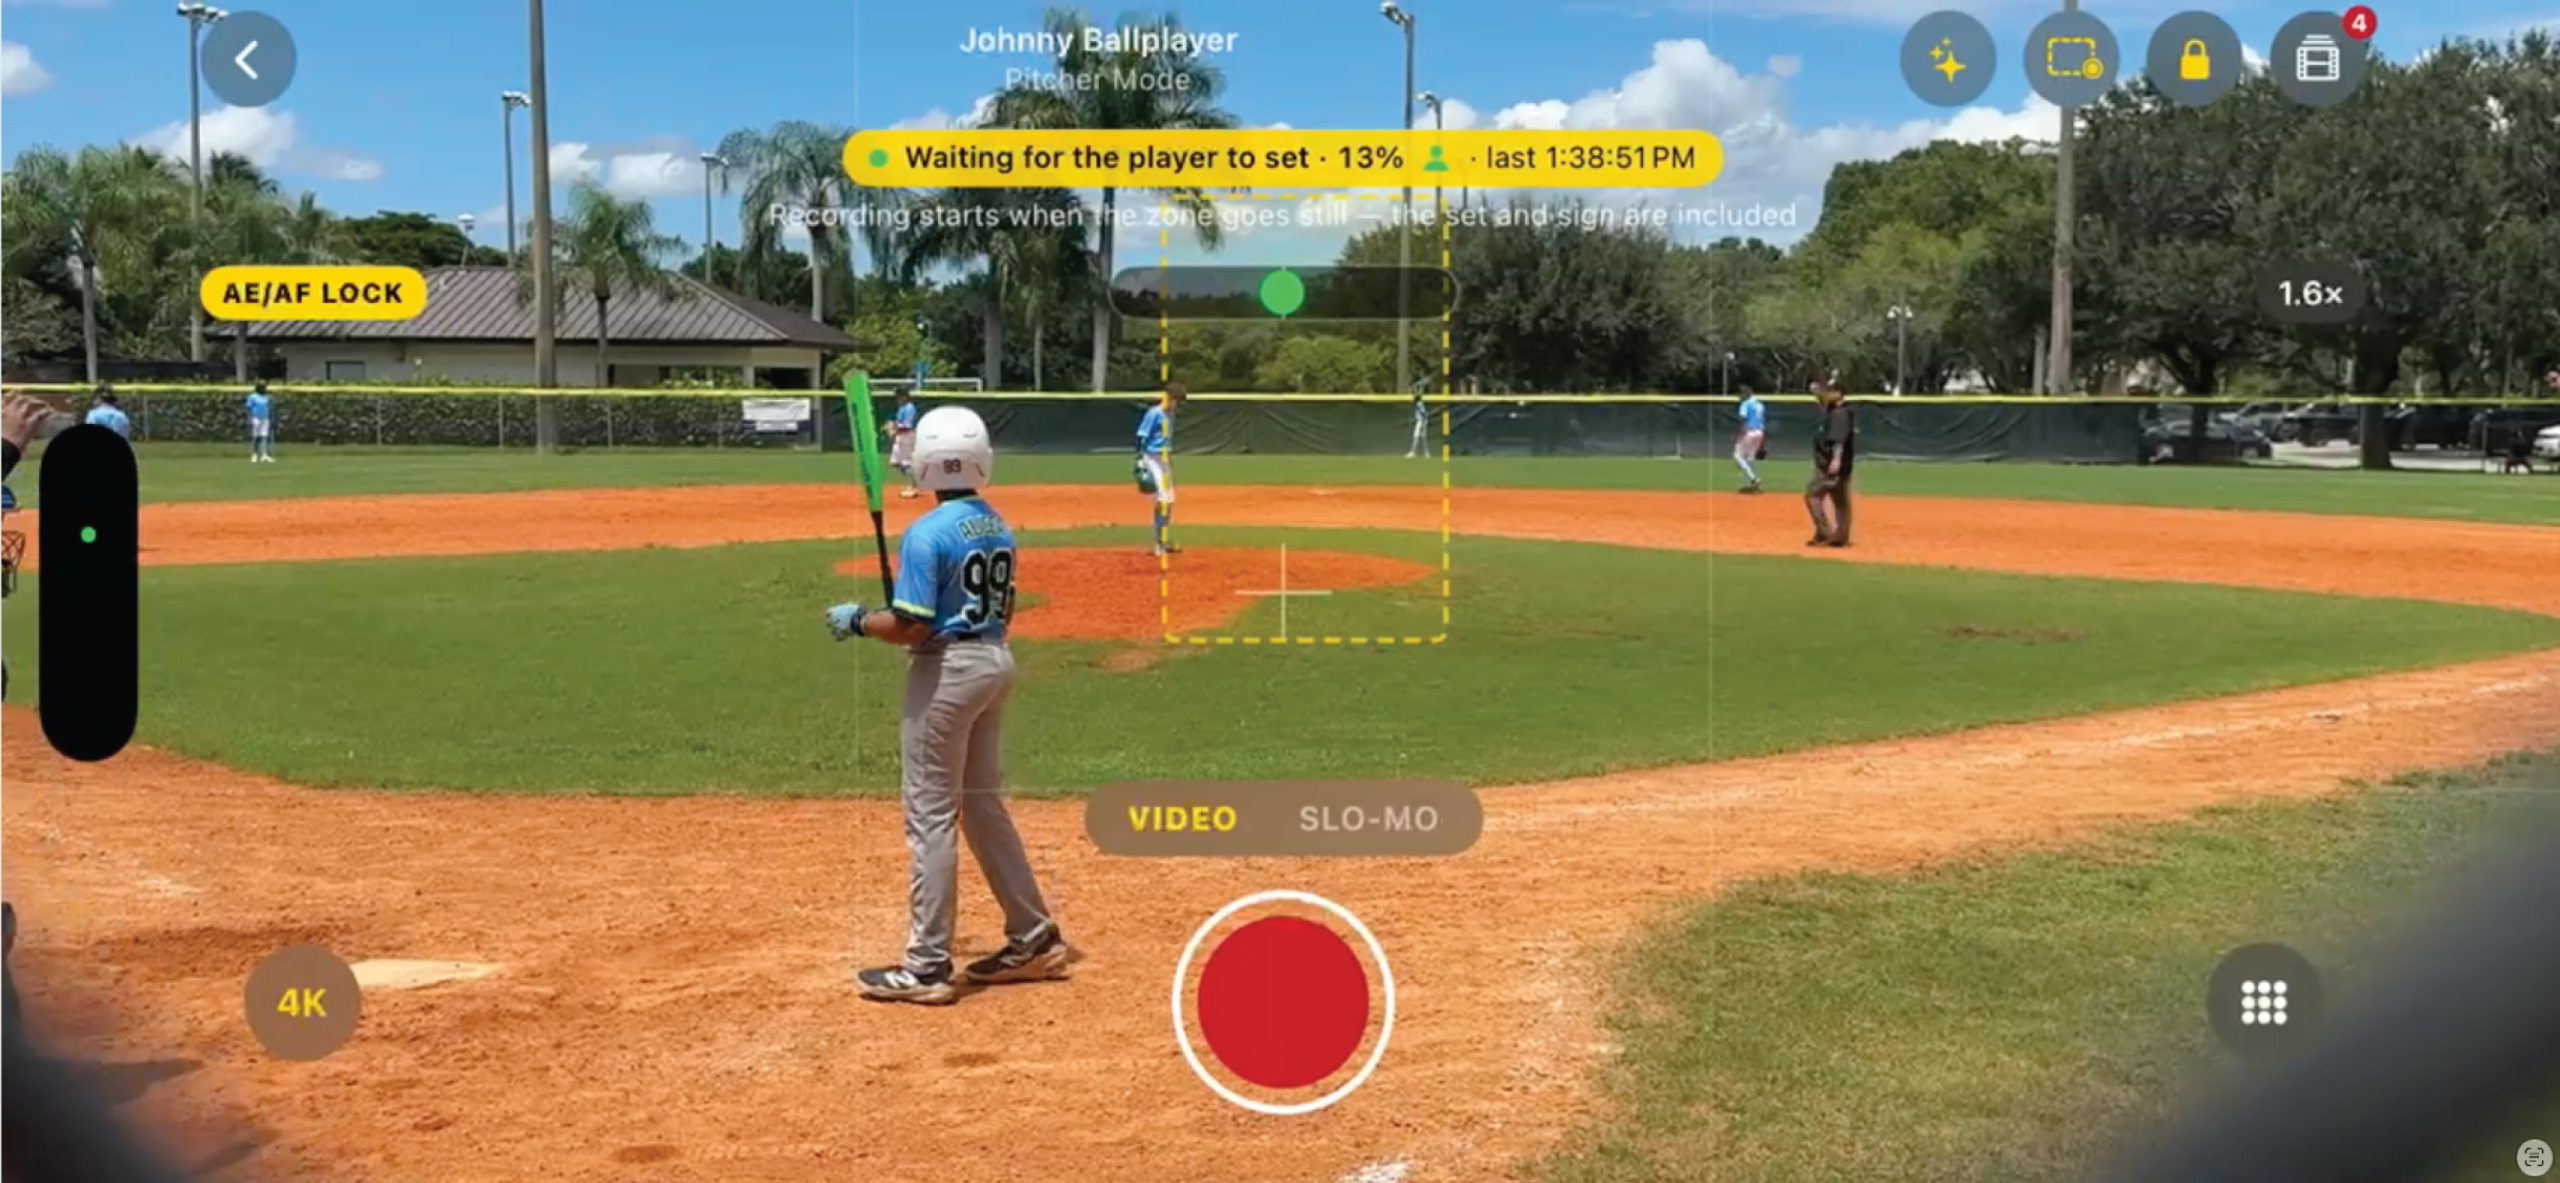
Use AI Auto Capture
Paid plans can detect the player’s set, action, and finish, saving each real play as its own clip.
Set up AI Auto Capture · Pro / Recruit Pro
Mount your phone
Use a tripod or fence mount, choose Pitcher or Hitter mode, and open the camera.
Enable Auto Capture
Tap the sparkles button in the top bar.
Set the detection zone
Tap the dashed-rectangle button, then tap the pitcher on the mound or the batter’s box. You can also drag to draw a snug box around where the player sets up.
Follow the status panel
The panel docks at the screen edge opposite your detection zone, keeping the play visible.
- Waiting for a player
- The person indicator is gray until a player is detected in the zone.
- Waiting for the player to set
- The indicator turns green. The app waits for the player to get still.
- Recording — waiting for the pitch
- Recording begins early enough to include the set and sign.
- Recording the play
- The clip ends automatically after the action settles.
Auto Capture waits for sustained action, helping avoid clips triggered by a brief shift or step. It discards recordings without a play. If the person indicator stays gray, zoom in so the player appears larger. Set your detection zone again for each camera session.
Camera controls and saved clips
- Pinch to zoom up to 8×; tap to focus and expose; use the lock icon to hold focus and exposure.
- 4K / HD changes quality. The grid button opens frame-rate, grid, and bubble-level controls.
- Use the VIDEO / SLO-MO wheel for regular or slow-motion capture. The default is 4K at 60 fps; slow motion uses supported 120 or 240 fps settings.
- Look for “Clip N saved”. Tap the film-stack icon in the top bar to review saved clips without leaving the camera.
- Slow motion is silent. Use regular Video mode for Auto Capture. Keep the phone shaded; switch from 4K to HD if the app suggests it during a hot session.
Remote tip: A Bluetooth camera remote or an iPhone volume button can start and stop recording without touching the screen.
Find the play. Keep the highlight.
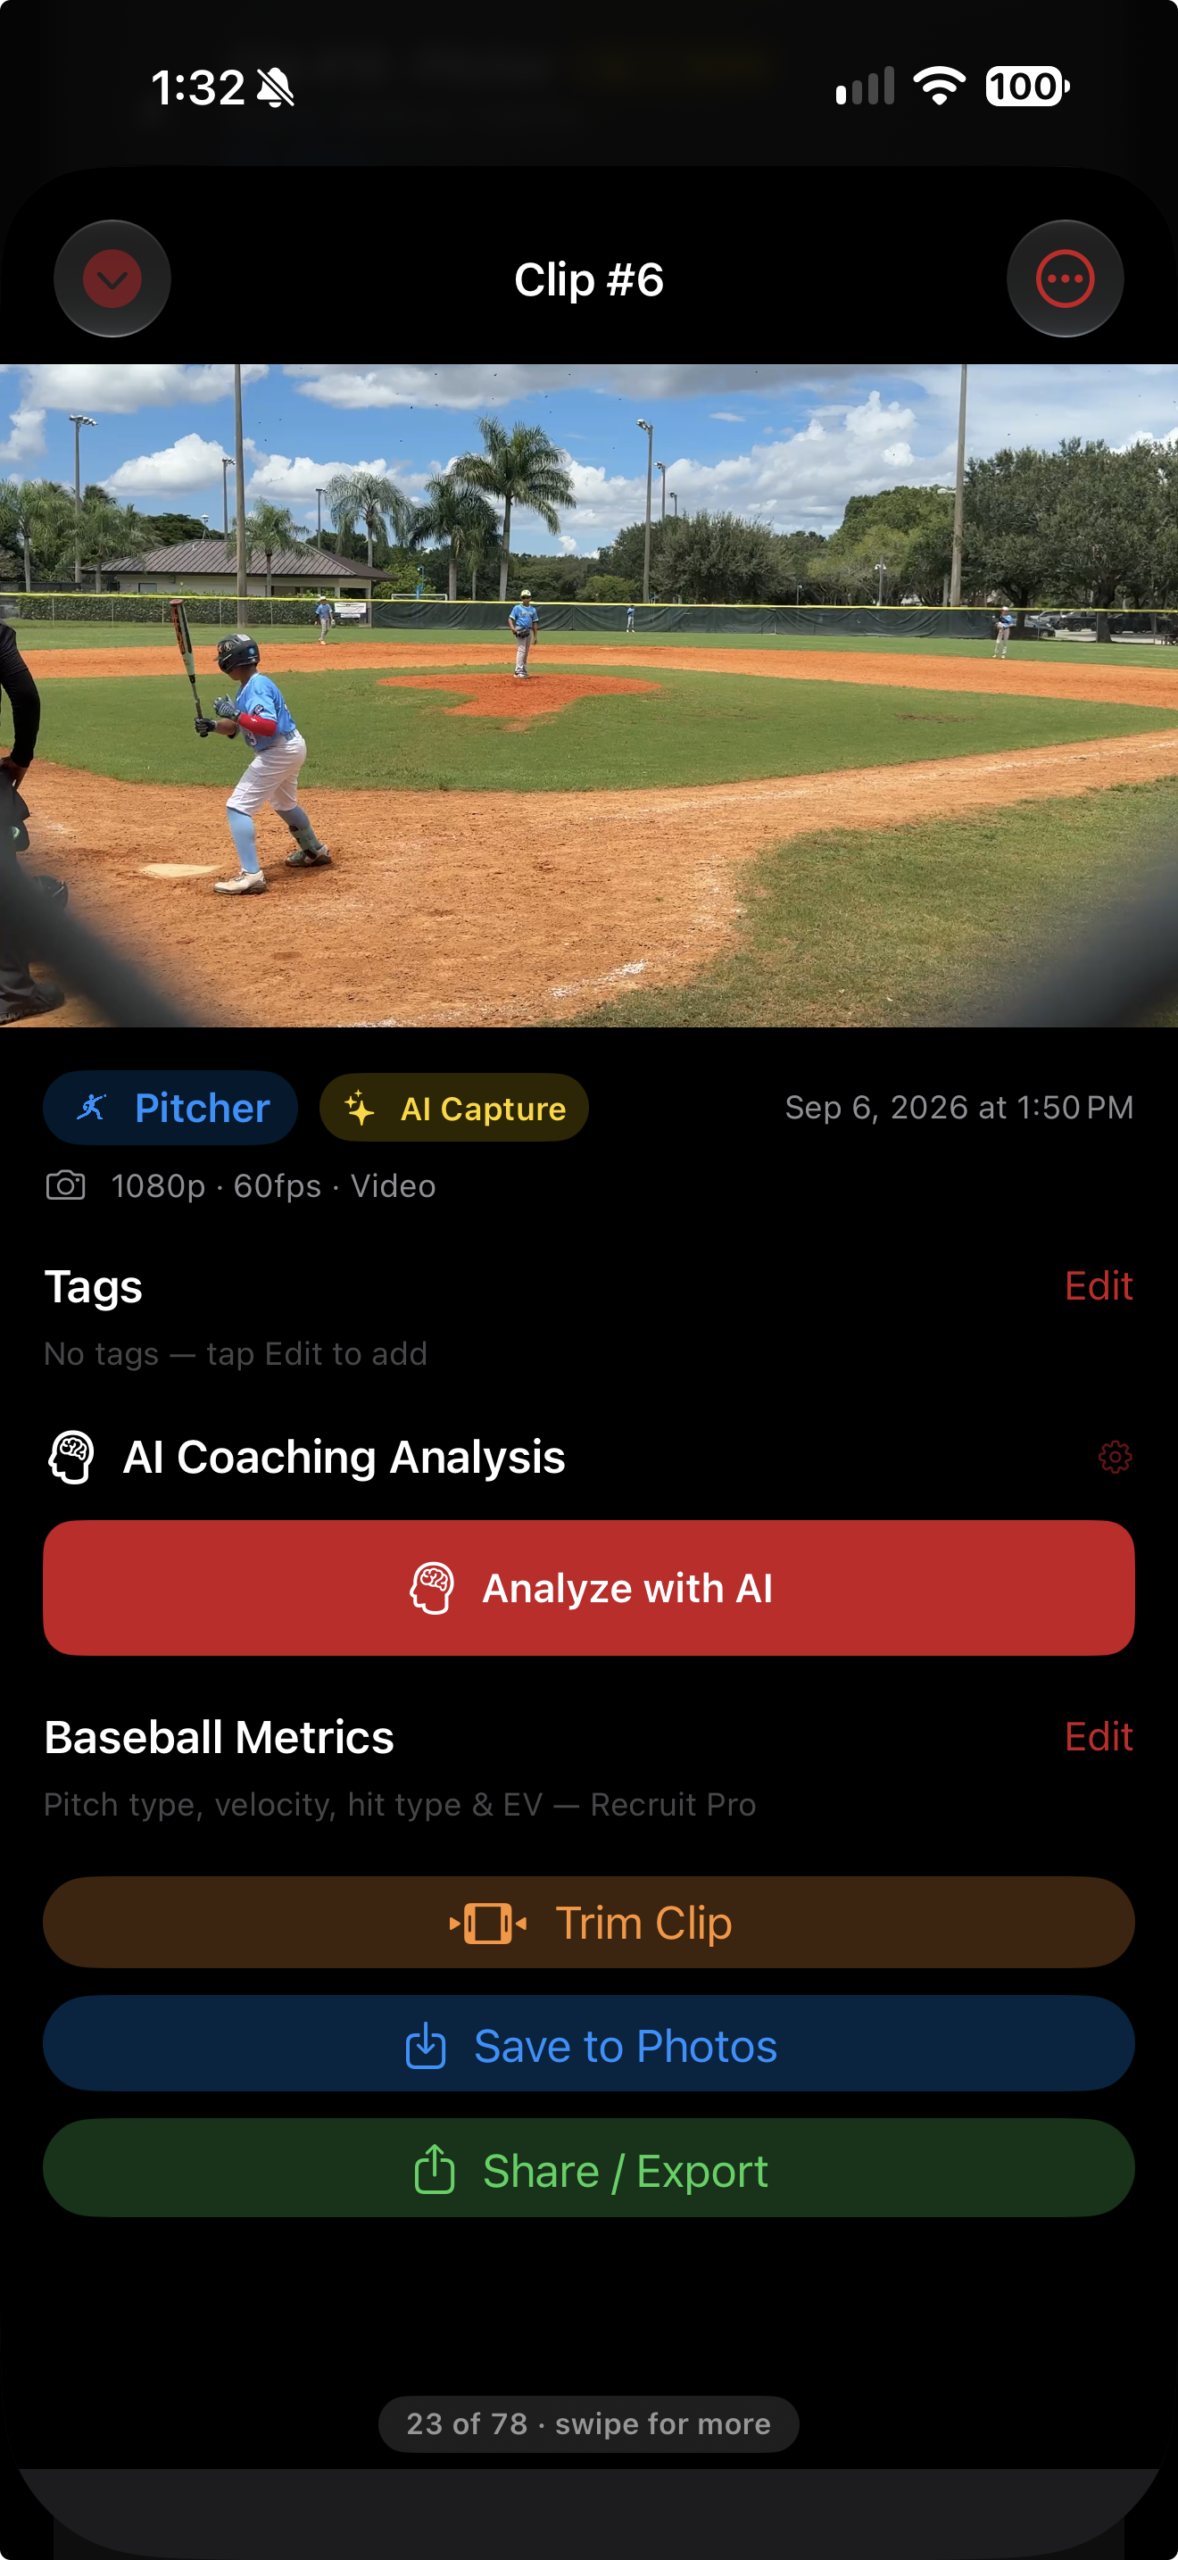
Open Library and select a clip. Find the pitch or swing, trim to the action, then add tags and feedback.
Find, play, and trim
Tap Find Pitch or Find Swing to locate the action on your device. Then use Play Pitch/Swing to jump to it or Trim to Pitch/Swing to keep just the play. Auto-captured clips arrive with action markers already set.
-
Add tags
Label pitch type, result, game context, or add a custom tag for easy searching.
-
Analyze with AI
Tap Analyze with AI for a Key Strength, Primary Focus Area, Drill Recommendation, and Next Session Goal. Requires Pro or Recruit Pro, internet access, and a signed-in account. Analysis is saved with the clip.
Recruit Pro: Open Baseball Metrics → Edit to enter pitch type, velocity, spin rate, or hitting metrics such as hit type and exit velocity. Save to include these details in supported exports.
Find Pitch / Find Swing · Included on every plan
Locate the action
Open a manually recorded or older clip and tap Find Pitch or Find Swing. The scan runs on your iPhone; this step uploads nothing. It looks for the pitcher’s wind-up or set through the finish, or the hitter’s load through just after the swing.
Check the detected play
Tap Play Pitch/Swing to jump to the detected action and review it.
Trim in one tap
Choose Trim to Pitch/Swing. The original is kept, so Revert to Original remains available. Use Trim Clip for a manual cut instead.
After a manual trim or Revert to Original: action markers and the review flag reset because the timeline changed. Run Find Pitch / Find Swing again when needed.
Understand the PITCH, SWING, and REVIEW badges
| Badge | Meaning and next step |
|---|---|
| Green scissors · PITCH / SWING | The clip has been trimmed to its detected action and is ready for highlight review. |
| Orange · REVIEW | The scan did not find a qualifying pitch or swing. Playback shows “No Pitch Detected” or “No Swing Detected” · Review. Review the footage, use Scan Again, trim manually, or delete it. |
| Yellow · AUTO | The clip was recorded with Auto Capture. It arrives with action markers, but that badge alone does not mean you have trimmed it. |
A REVIEW flag does not delete your clip. Clips without detected action are kept whole rather than automatically trimmed.
Playback, searching, and bulk actions
- Pinch to zoom, drag to pan, and double-tap to reset. Use Trim Clip to shorten footage and Revert to Original to undo the trim.
- Open Tags → Edit for pitch types, results, session context, or custom labels.
- Open a player’s library to search by session or tag, filter by mode, and sort. In Library, use Select to compare exactly two clips, share, save, or delete. Deleting asks for confirmation first.
- Use Save to Photos or Share / Export on the playback screen. Saved AI analysis is included with supported shares.
Manual-mode analysis: Choose Pitcher or Hitter when prompted. AI analysis sends selected still frames and relevant context online. Set the player’s competition level, if available, to tailor coaching depth. AI use has a daily limit; recording and playback remain available if AI fails.
Deleting: Removing a player also removes that player’s local clips and related saved analysis and metrics. Backed-up iCloud copies remain separate.
Two separate tools: Find Pitch / Find Swing scans on your iPhone. Analyze with AI requires Pro or Recruit Pro and sends selected still frames and relevant context online for coaching feedback.
Compare mechanics frame by frame
Pro / Recruit ProSelect two clips to evaluate progress, timing, positioning, or mechanical changes.
-
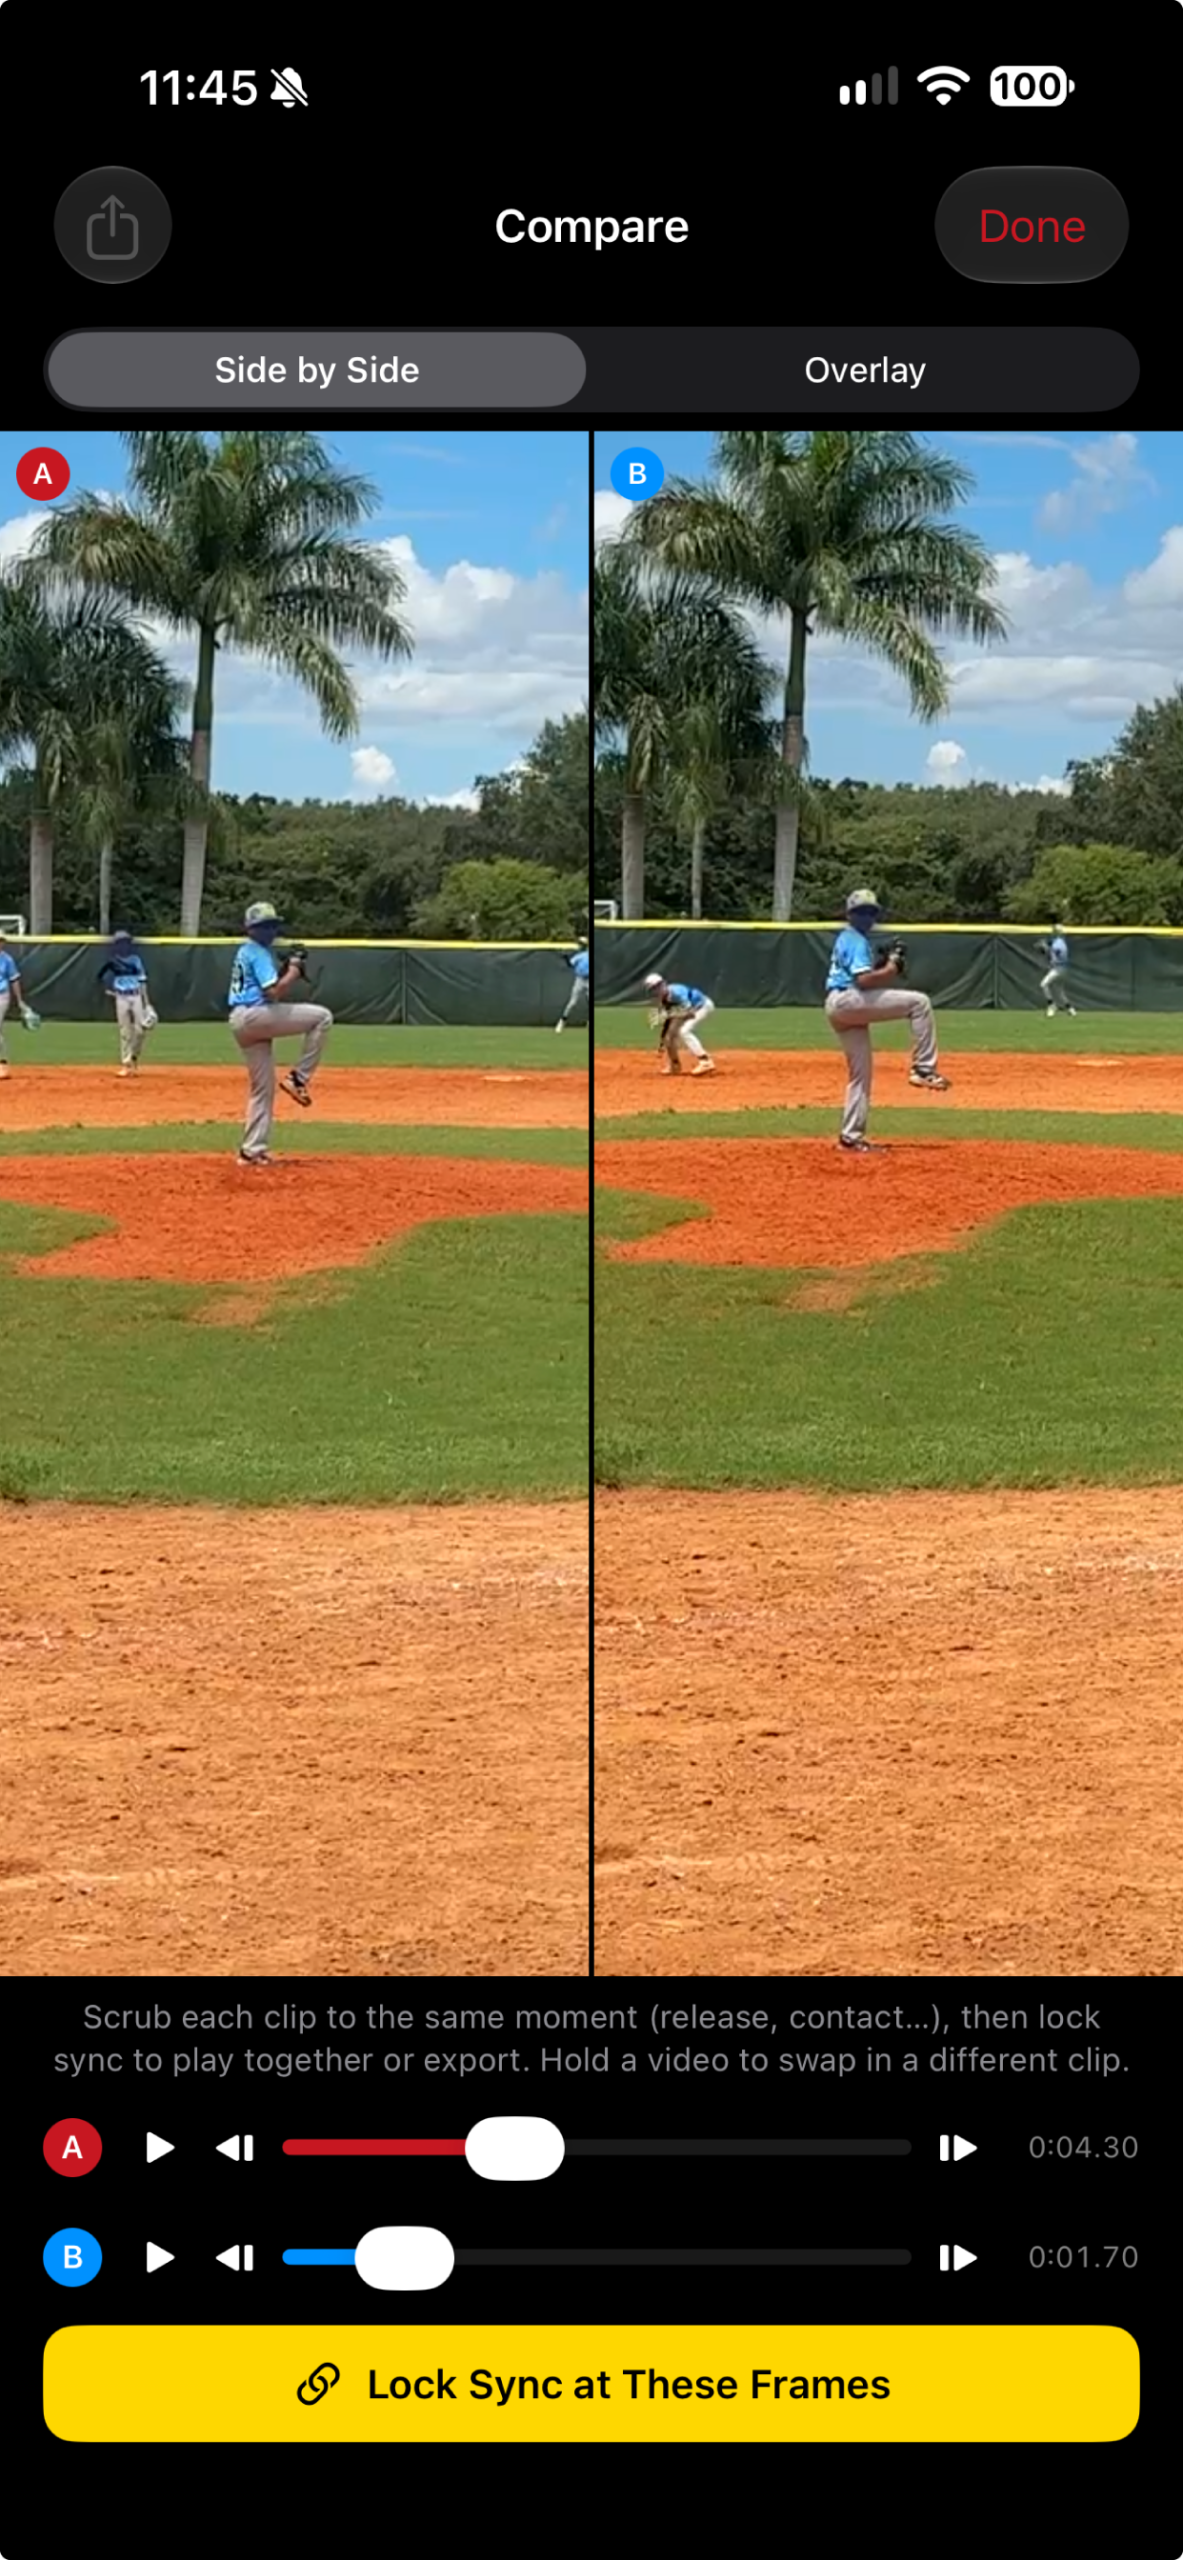
Choose clips A and B
Open More → Side-by-Side Comparison, or select exactly two clips in Library and tap Compare.
-
Match the moment
Use each clip’s slider and frame-step buttons to match release, foot plant, contact, or another shared moment.
-
Lock sync
Tap Lock Sync at These Frames, then play, scrub, or step through both clips together. Choose ¼×, ½×, or 1× speed. Tap Adjust Sync to realign.
In Side by Side, zoom each pane independently up to 6×. In Overlay, use the A ↔ B slider to blend clips; zoom and pan move both together. Double-tap to reset.
Swap a clip without starting over
- Press and hold either video to replace clip A or B from your Library. In Overlay, choose which clip to replace.
- Your layout, zoom, blend, and the other clip’s position stay in place. The sync lock releases so you can align the replacement.
- Scrub the new clip to the matching moment, then tap Lock Sync again. The clip in the other slot is dimmed in the picker, keeping A and B different.
Export your synced comparison
Lock sync, then share
Tap the share button at the top left. The app renders the overlapping synced portion as one video using your Side by Side or Overlay layout, including the blend setting.
Choose the framing
If you zoomed in, choose Crop to Zoomed View to export the viewport you framed, or Export Full Frame to keep the whole picture.
Comparison exports are silent and leave both original clips unchanged. Side-by-side exports support a combined width of up to 3840 pixels; actual output depends on the source clips and layout.
Share the moment—or build the story
Use quick social tools for a single post, or create a recruiting summary from a larger collection of clips.
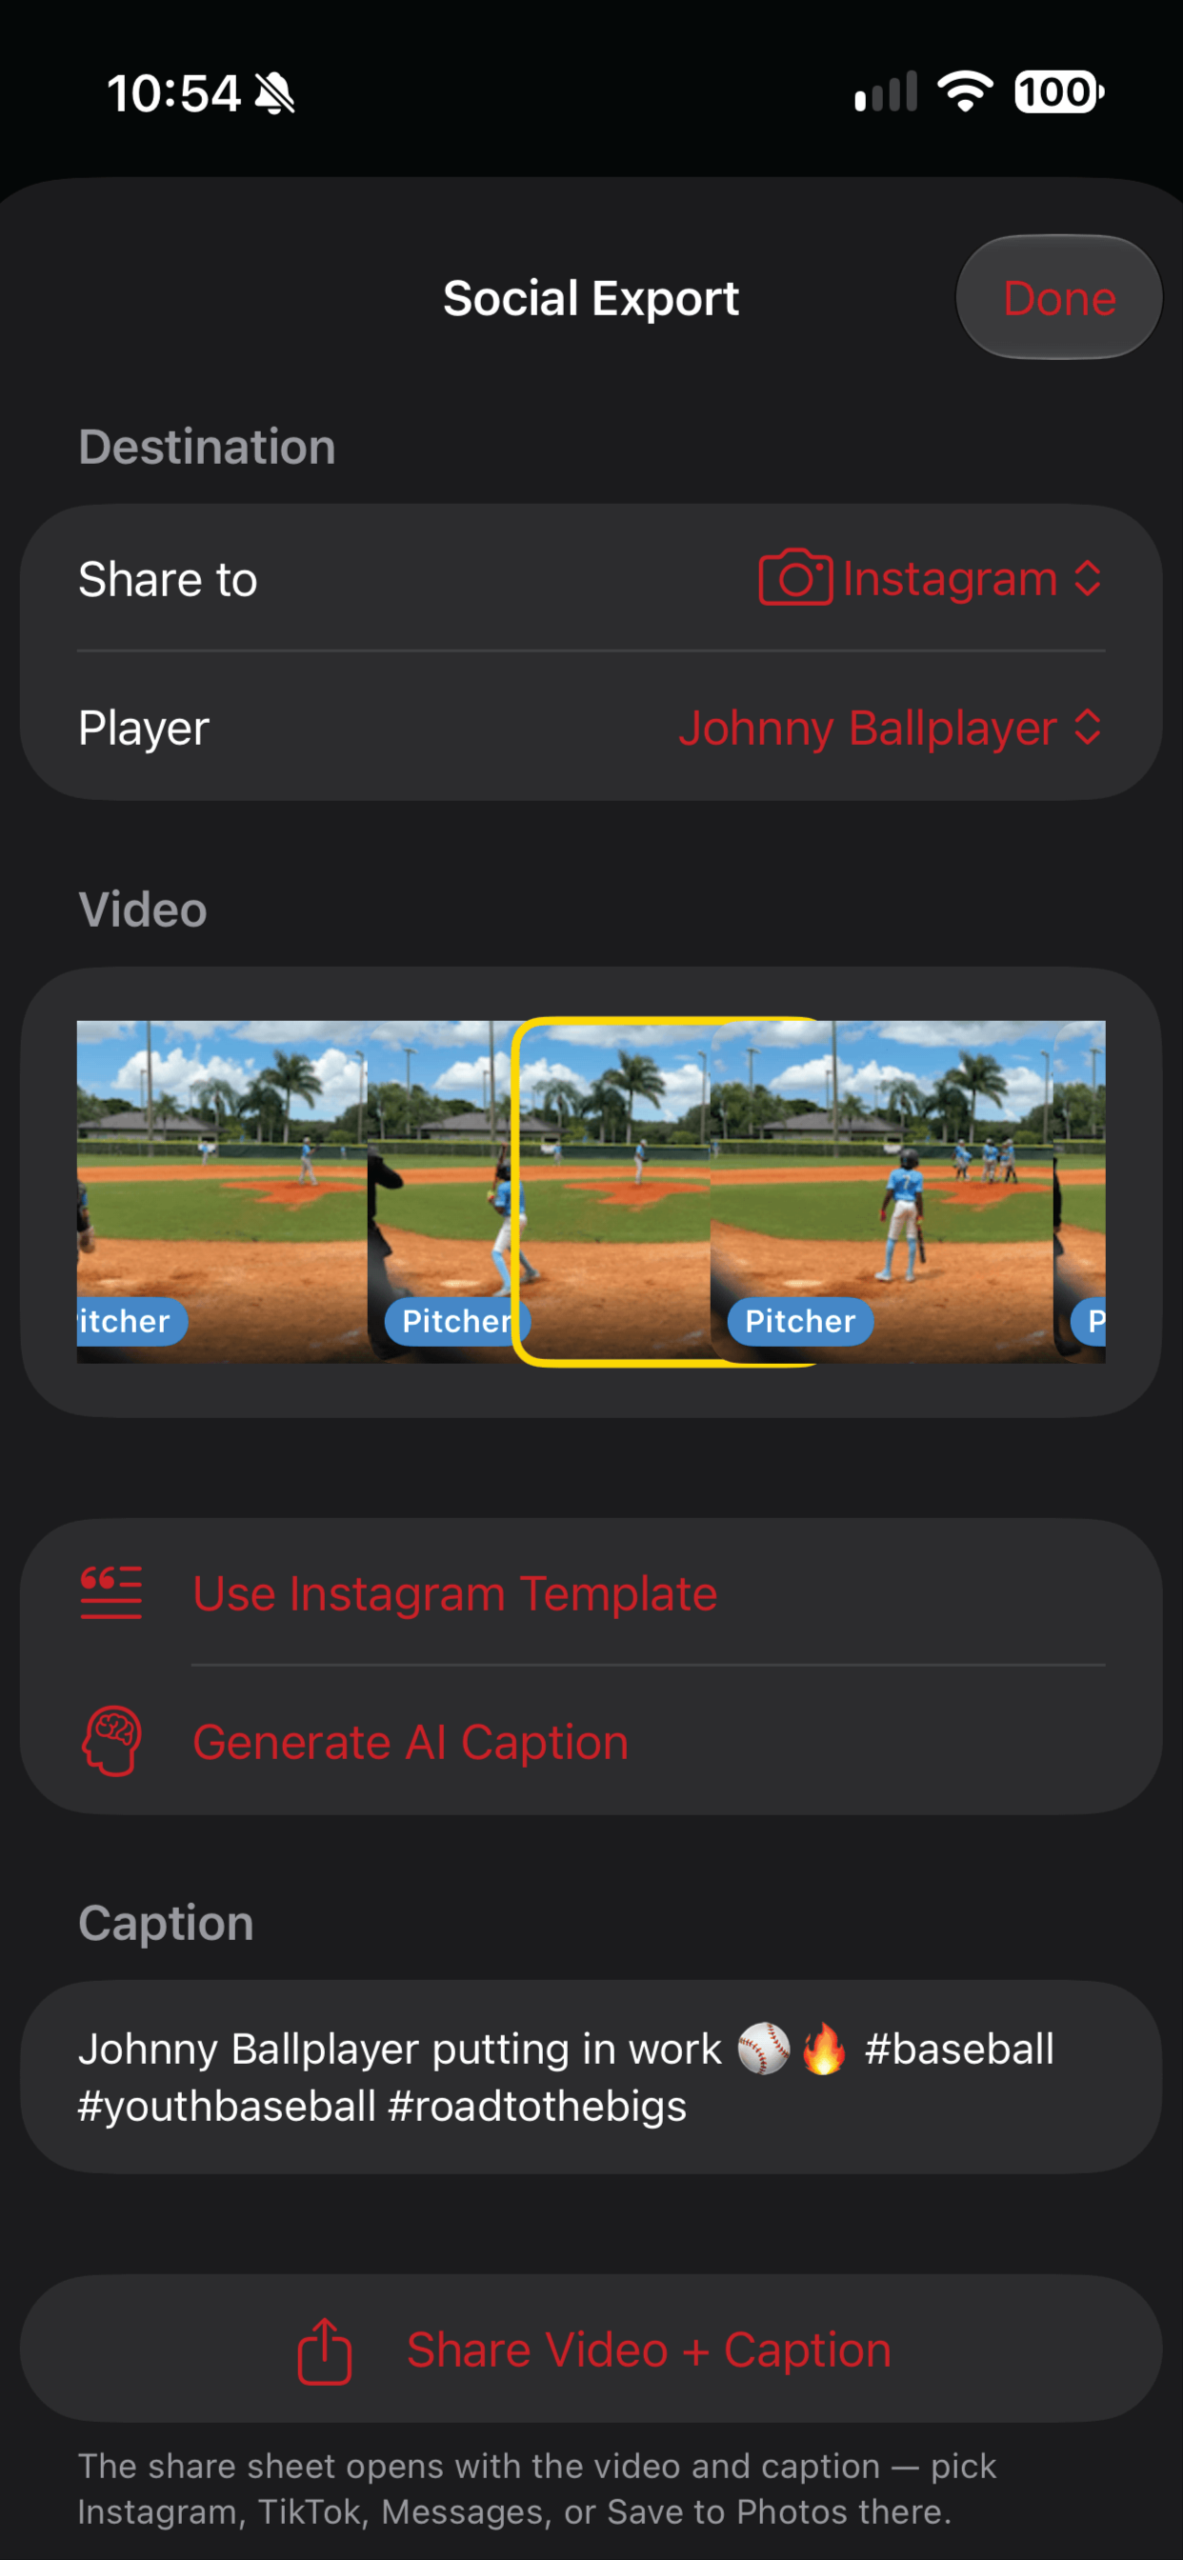
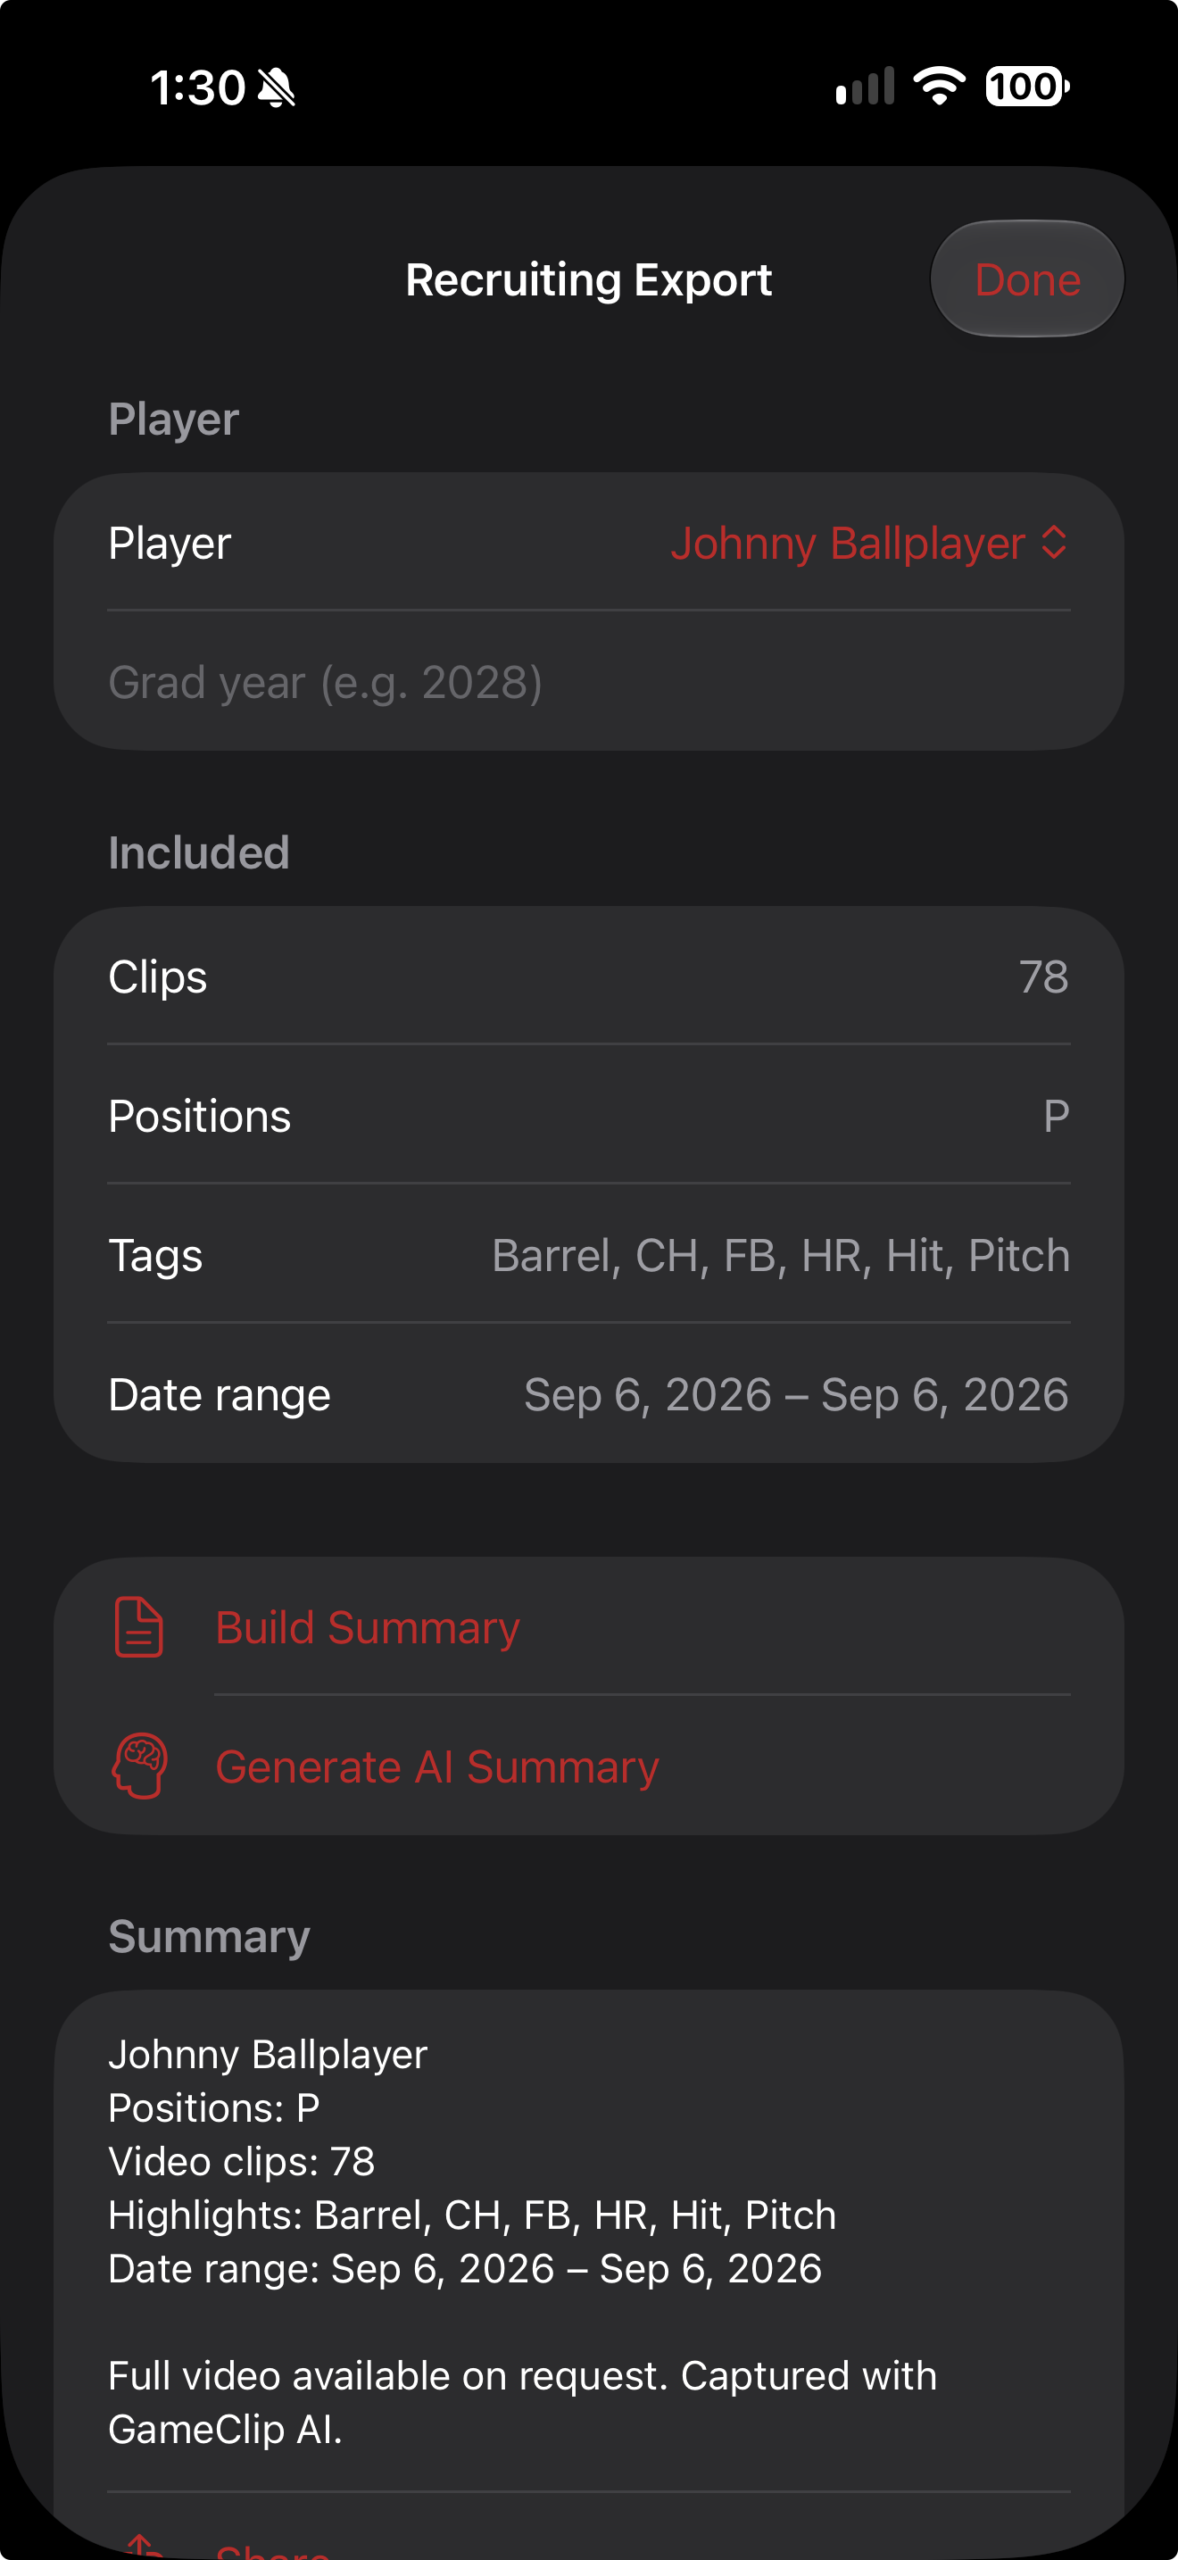
Use a template
Create a platform-ready caption instantly without waiting for AI.
Generate with AI
Turn the selected player, clip, and tags into a polished caption or summary.
Share visible metrics
Burn a clean lower-third stat overlay into a temporary share copy of the video.
Share a caption or recruiting summary
- Social Captions · Pro / Recruit Pro: Pick a destination and player, select a clip, then use a template or Generate AI Caption. Tap Share Video + Caption. With no clip selected, Share Caption shares text only.
- Recruiting Export · Pro / Recruit Pro: Pick a player and graduation year, tap Build Summary or Generate AI Summary, then use the share button. This creates a text summary.
- Metrics overlay · Recruit Pro: Save metrics first, then use Share with Metrics Overlay from playback or enable Burn metrics overlay onto video in Social Captions. Your original clip stays unchanged.
Build a Best Recruit Reel · Recruit Pro
Tag the clips you want considered
Only tagged clips are eligible. Add useful result or session tags, plus any metrics or saved AI feedback you want included in the ranking.
Review the top picks
Open More → Recruit Pro → Best Recruit Reel and select the player. The app ranks up to five top picks using tags, saved metrics, and analysis information.
Build and share
Add a caption or tap Generate AI Caption, then Build & Share Reel. The app uses detected action markers, scanning clips that need them, to stitch pitches and swings into one video.
Review before sharing: clips without detected action remain whole and are flagged for review. Check them for extra footage. The exported reel leaves your source clips unchanged.
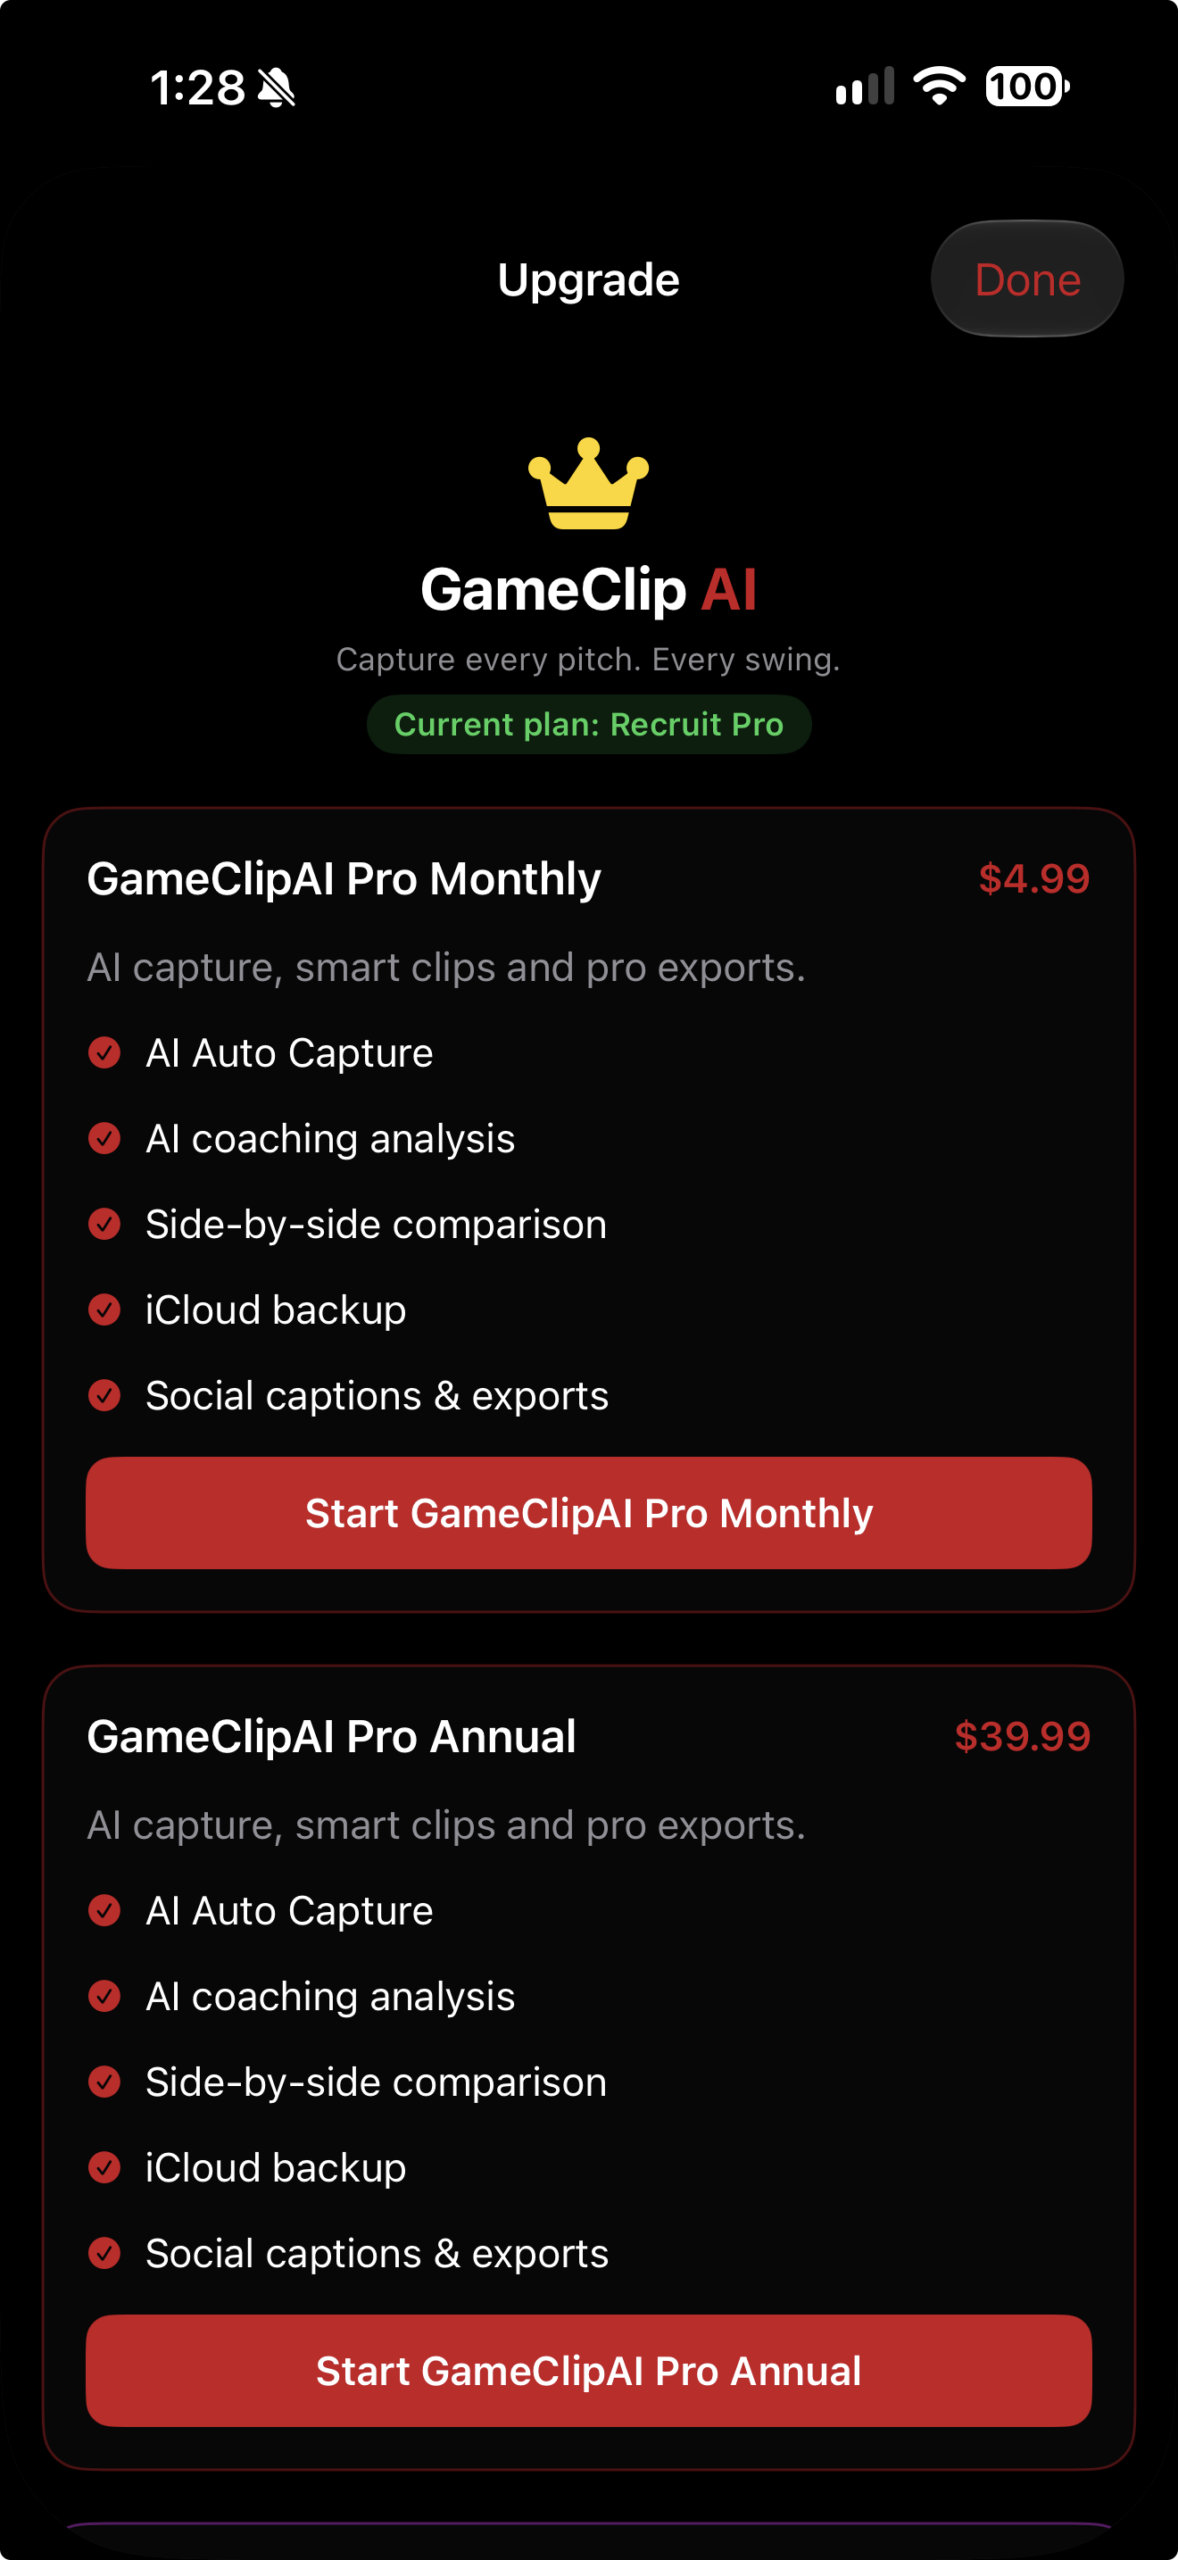
Open More for advanced features
The More tab keeps your plan, premium tools, and app settings in one place.
Free
Up to 3 players, manual recording, Bluetooth remote control, framing and pitcher camera-angle guidance, player libraries, tags, on-device Find Pitch / Find Swing, one-tap action trimming, and standard saving and sharing.
Pro
Up to 3 players. Everything in Free, plus AI Auto Capture, AI coaching feedback, synced comparison and export, social captions, recruiting summaries, and optional iCloud backup.
Recruit Pro
Unlimited players. Everything in Pro, plus entered baseball metrics, metrics overlays, and Best Recruit Reel with automatic cuts to detected pitches and swings.
Tap View Plans or Change beside your current plan to view options. Use Restore Purchases on the plans screen if needed. Open More → Settings for account, subscription, privacy, and storage controls.
Back up and restore clips with iCloud · Pro / Recruit Pro
Enable iCloud backup
Sign in to iCloud on your iPhone, then open More → Settings → Storage → Cloud Storage → iCloud. Backup is off by default.
Include your existing footage
New clips back up automatically when enabled. Tap Back Up Existing Clips to include the clips already in your Library.
Recover missing files
Use Restore Missing Files from iCloud when footage is missing or after reinstalling. Recovery depends on the copies available in your iCloud account.
Backup keeps local files on your phone. Pending backups resume when you reopen the app. Deleting a local clip does not remove its iCloud copy; backed-up clips can return during recovery. Backup is private to your Apple account.